
I moved into my first apartment almost one year ago and as soon as I signed the lease, I couldn’t wait to start decorating. I’m pretty good at crafting, if I do say so myself, so I’ve managed to create several things that I can hang on my wall without shame. For those of you who don’t share my talent, here are a few ideas that will get you started.
My favorite way to craft is “upcycling,” or turning something obsolete into something useful. Buying materials at craft stores is really expensive and most of your supplies will go to waste. Upcycling is a great way to save money because you can use things that you already have.
If you’ve burned through a candle, re-use the empty container. You can re-fill it with wax to make a new candle, or do what DePaulia’s Editor-in-Chief Courtney Jacquin does and use it to grow a small plant in. You can also do the same things with mugs you aren’t using. I like to use old teacups with pretty patterns that I find at thrift shops for either of these options.
I like having plants around my apartment as decoration. It’s kind of my way of proving to guests that I am responsible enough to keep another living thing alive. It also makes my space feel a little homier because I’m used to being around nature.
For another simple DIY, use a wine bottle for a vase. There are a lot of ways to dress up an empty bottle. First, remove the label by soaking the bottle in warm water and soap for at least 15 minutes, then peeling it off. You can wrap either string or painter’s tape around the bottle, spray paint it, then remove the wrappings once it’s dry. Or roll the bottom half of the bottle in glue, then glitter and let it dry. If you don’t want to put that much effort to it, just keep it simple and use the bottle as is.
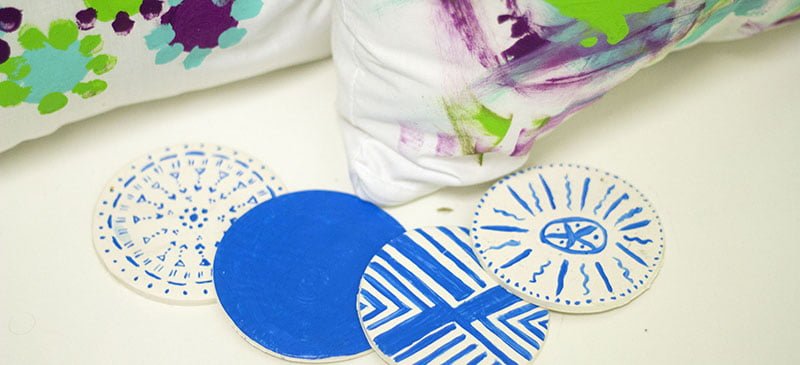
For décor in my room and storage for my jewelry, I used an old picture frame to create a jewelry holder that hangs on my wall. To achieve this, remove the glass and backing from a wooden picture frame, paint it any color you want, and use a staple gun to attach several wires from one side to the other. I enjoyed using the staple gun — I have little experience with power tools so I felt pretty powerful using it. If you don’t have access to a staple gun, wrap the wire around the side a few sides before moving to the opposite side. You can hang your earrings from that wire. Then, screw hooks into the bottom of the frame to hang your necklaces on.
We’ve all seen funny Pintrest fails on the Internet so it’s known that the success rates for DIY projects are very low. For the best chance of success, plan for plenty of time to work on your DIY. If you rush through the steps, your project will be a sad mess.
Also, know your crafting limitations. Think about steps to complete a DIY project, and ask yourself if you possess the necessary skills before tackling it. For example, if a project involves some sort of intricate painting, but you’ve never painted before, practice before painting on your final product. Or if you want to create a DIY to display your favorite quote, but your handwriting resembles a second-grader’s, use a stencil or ask a friend with good handwriting to write it out for you.
No matter how hard you try to make some cute décor, it’s OK if it doesn’t turn out. Usually the process is a lot more complex than the instructions let on. My friend and I once attempted to make picture frames out of old records. We bought stacks of records from a thrift store and followed some simple directions from a website we found. Despite our determination and countless attempts, not a single record turned out. It pains me to think about the records that went to waste that day, but we had a lot of fun failing.
If you view your DIY as a fun activity, you won’t be so disappointed if it doesn’t turn out.
Editor’s Note: This article is part of The DePaulia’s 2015 Apartment Guide. To view more articles from this special section, click here.


Danica • Oct 28, 2015 at 2:48 am
To be honest, its my first time to encounter the word up-cycling so I googled it. “It is the process of converting old or discarded materials into something useful and often beautiful.” Its the same as recycling. I never used this method when I decorated my room, thank you for the tips Carolyn. I’m gonna try this out.
Daphne • Jun 1, 2015 at 12:07 am
It’s sad that I can’t view the video right now, I’ll watch it later. It’s my first time to come across this “upcycling” method. I find it quite interesting. I always follow the philosophy of finding thing and make them work vertically. Because you have little room to work with right? so you have to make the most out of your walls.
Alex Jennings • May 21, 2015 at 9:55 am
Those pillows that you crafted in your video are stunning! I’m thinking about doing something like that with my kids. Up-cycling—the art of turning something obsolete into something useful—is one of my favorite approaches to making apartments look more homey. If all else fails, Pinterest has always has some great ideas!
Alex Jennings |
Ross Cameron • May 18, 2015 at 9:40 pm
Hey Carolyn, These are great ideas! Upcycling is also one of my fav decorating approaches, there are so many great ways to reuse things. I like going to yard sales and flea markets also.